Ilum's MinIO via VS Code on Local Machine
This guide explains how to connect your local VS Code installation to Ilum's MinIO object storage, allowing you to browse, upload, download, and manage files directly from your preferred development environment.
If you are connecting to Ilum's Jupyter via SSH (as described in VS Code Jupyter Integration), the MinIO extension must be configured in a separate local VS Code window, not in the remote SSH session. The extension connects directly to MinIO from your local machine.
Prerequisites
Before you begin, ensure you have the following:
- Local VS Code Installation: Download and install VS Code on your machine
- VS Code Extensions:
- kubectl Access: Configured access to your Ilum cluster with appropriate permissions
- MinIO Credentials: Access key and secret key for your Ilum MinIO instance (default:
minioadmin/minioadmin)
Methods of Connecting to MinIO
There are two primary ways to expose MinIO to your local VS Code. Choose the method that best fits your environment:
| Feature | Port Forwarding | NodePort |
|---|---|---|
| Best For | Quick access, secure connection, firewalled environments | Persistent access, shared team access |
| Setup Complexity | Low (single command) | Medium (requires NodePort configuration) |
| Persistence | Temporary (terminal must stay open) | Persistent (survives terminal close) |
| Security | Higher (localhost only) | Requires network security consideration |
Step 1: Expose the MinIO Service
- Option A: Port Forwarding (Recommended)
- Option B: NodePort
Port Forwarding (Recommended):
kubectl port-forward svc/ilum-minio 9000:9000
This command creates a secure tunnel from your local machine's port 9000 to the Ilum MinIO service. Keep this terminal session open while working with MinIO.
Your MinIO endpoint will be: http://localhost:9000
Using NodePort Service:
Instead of creating a new service, it is recommended to patch the existing MinIO service to expose it via NodePort. This approach avoids issues with selectors in Helm installations.
First, find the existing MinIO service:
kubectl get svc | grep -i minio
Then patch the existing service to changs its type to NodePort:
kubectl patch svc ilum-minio -p '{"spec":{"type":"NodePort"}}'
Finally, retrieve the assigned NodePort:
kubectl get svc ilum-minio -o wide
And find the Node IP:
kubectl get nodes -o wide
Your MinIO endpoint will be: http://<node_ip>:<nodeport> (e.g., http://192.168.49.2:31234)
Step 2: Install MinIO Extension
- Open VS Code
- Go to Extensions (Ctrl+Shift+X / Cmd+Shift+X)
- Search for "MinIO"
- Click Install
Alternatively, install directly from the VS Code Marketplace.
Step 3: Configure the Extension
- Open VS Code Settings (Ctrl+, / Cmd+,)
- Search for "MinIO"
- Configure the extension with your connection details.
Since configuration keys may vary between extension versions, look for fields corresponding to Address/Server, Access Key, and Secret Key.
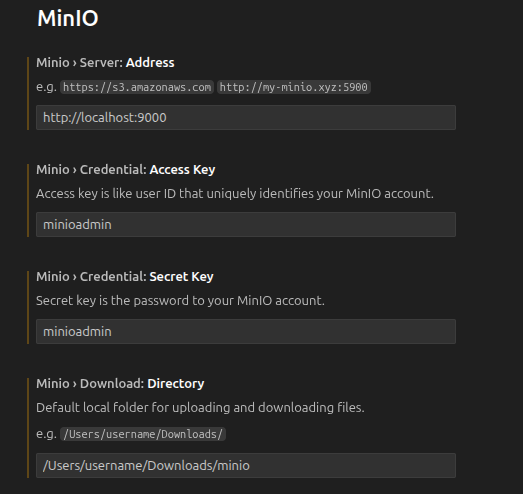
Typically, you will need to provide:
- Address/Server: The URL to your MinIO instance (e.g.,
http://localhost:9000orhttp://<node_ip>:<nodeport>) - Access Key: Your MinIO user (default:
minioadmin) - Secret Key: Your MinIO password (default:
minioadmin)
Some versions may also ask for a default Bucket Name or Download Directory.
Ilum typically creates the following buckets:
ilum-files— Spark job files and JARsilum-data— Data files and tablesilum-mlflow— MLflow artifacts
Working with Ilum Spark Jobs
Once connected, you can use MinIO to:
- Upload Spark JARs: Upload compiled job JARs to
ilum-filesbucket for execution - Browse Data: View data files stored in
ilum-databucket - Download Results: Download job output files to your local machine
Example Workflow
- Develop and compile your Spark job locally
- Upload the JAR file to
ilum-files/jars/via MinIO Explorer - Submit the job via Ilum UI or REST API referencing the S3 path
- Download results from MinIO after job completion
Troubleshooting
Click to expand troubleshooting steps
Connection Issues
-
Connection refused: Ensure the port-forward command is running or NodePort is correctly configured
Check Port Forward# Re-run port forward if connection is lost
kubectl port-forward svc/ilum-minio 9000:9000 -
Access denied: Verify the access key and secret key are correct
-
Bucket not found: Ensure the configured bucket name exists in MinIO
Extension Issues
- Explorer not showing: Reload VS Code window (Ctrl+Shift+P → "Reload Window")
- Settings not saving: Check that you're editing User settings, not Workspace settings
Performance Considerations
- Large files: For very large files, consider using MinIO CLI (
mc) instead - Network latency: Port-forward connections may have slight latency compared to direct access
Security Notes
- All data transfers happen within your secure kubectl tunnel or cluster network
- Avoid exposing MinIO via LoadBalancer without proper authentication
- Use trusted networks when establishing these connections
- Consider using MinIO's built-in access policies for production environments
Next Steps
Once you have VS Code successfully connected to Ilum's MinIO storage, explore:
- VS Code Jupyter Integration: Connect VS Code to Ilum's Jupyter kernels
- Running Spark Jobs: Submit and monitor Spark jobs
- Data Science Platform Features: Overview of Ilum's data science capabilities